Correct full Trios scan scanning strategy
09/11/2023Importance of Scan Strategy: Avoiding Common Quality Issues
If you don't follow the Scan Strategy, you will get bad quality results, as follows:
- Scanstop due to split teeth.
- Inaccuracy on bridges.
- Low detail on the margin line.
- Spend too much time scanning.
- Fitting restoration complaints.
- Post-processing errors.
- Overlapping scan.
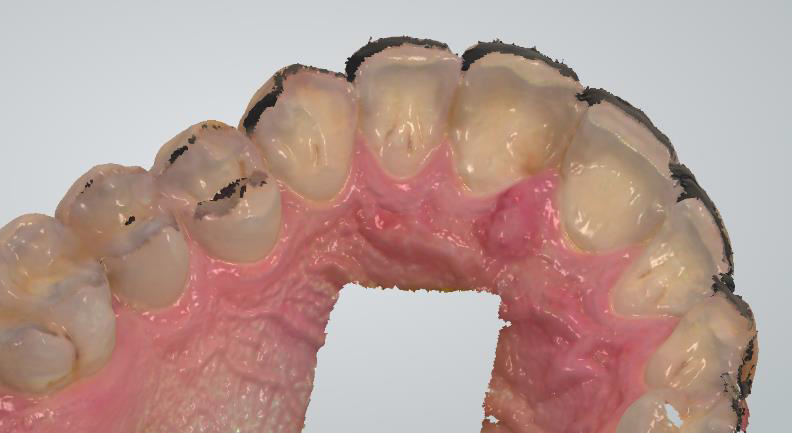
This is an example of a very common mistake when scanning incisors:
Effective Trios Scan Strategy: Key Techniques and Best Practices
Go slow over centrals, wiggle over central, and rotate over preparation to get better details.
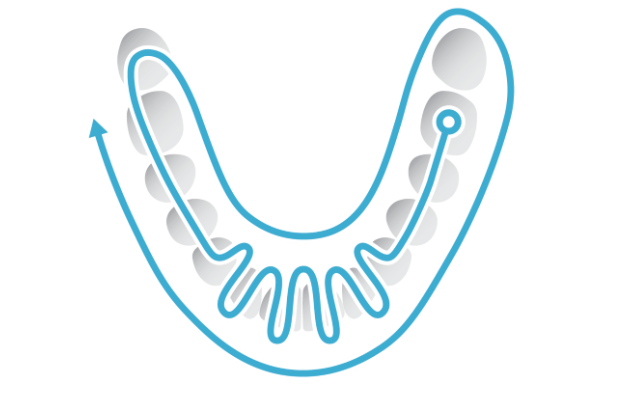
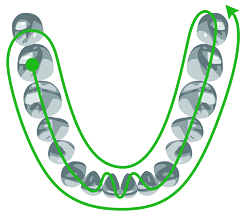
Lower Scan: The recommended scanning path consists of 3 sweeps: Occlusal, lingual, and buccal. The best scanning method is to start with the molar occlusal surface.
- Wait 3-5 clicks, then move towards the incisors.
- Slowly wiggle the scanner when passing centrals.
- Continue until the last molar.
Remember to move the scanner smoothly without jumping around. - When you reach the last molar, turn slowly lingual, taking care of areas where soft tissue may interfere with the scan.
- Roll the scanner 60-90 degrees to the lingual side and use the tip to keep the tongue away.
- Go along the lingual surface of the whole arch, until reach the last molar on the opposite side.
- Roll to the buccal side and complete the buccal swipe.
- Go along the buccal surface of the whole arch.
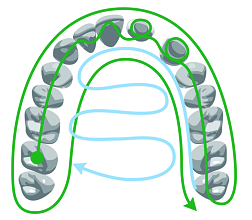
Upper arch scan:
As an option, you can choose to turn the tip up for easier upper arch scanning.
The recommended scanning path consists of three swipes: occlusal, buccal, and palate.
- Start the scanner while it rests occlusal on the molar, wait 3-5 clicks.
- Move towards the centrals, capturing the occlusal surface.
- Continue slowly during the centrals and again continue along the occlusal surface until you reach the last molar.
- Turn slowly buccal by rotating the scanner 60-90 degrees at the last molar and complete the buccal swipe taking care of areas where soft tissue may interfere with the scan.
- Go along the buccal side until reach the last molar on the opposite side.
- Then roll to the palate side and complete the swipe.
If you wish to include the palate in the scan, swipe back to position the scanner behind the incisors and then slowly go from side to side the palate in the distal direction.
Lower quad antagonist scan :
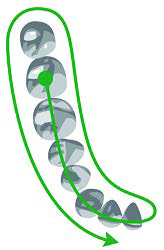
Step 1: Antagonist: Start directly on the occlusion (the first molar), then sweep along the occlusion.
Step 2: Lower jaw: Roll 45-90 degrees to the lingual side and sweep to the second molar. Use the tip to keep the tongue away.
Step 3: Roll to the buccal side and complete the buccal sweep.
Upper quad with preparation scan:
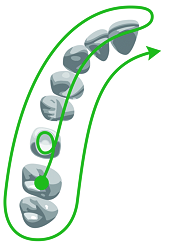
- Start directly on the occlusion (the first molar), then sweep along the occlusion till the preparation.
- Scan the preparation:
- Go to the occlusal side of the preparation
- Roll to the palatal side.
- Roll to the buccal side.
- Rotate almost 90 degrees to get the best angle for the distal and mesial contact points.
- Rotate back to the occlusal.
- Continue swiping along the occlusion.
- Roll 45-90 degrees to the buccal side and complete the buccal sweep on one side of the preparation.
- Roll to the palatal side and complete the sweep.
Lower full arch antagonist scan:
- Start directly on the occlusion (first molar), then sweep along the occlusion. Slowly wiggle the scanner when passing the centrals;
- Roll 45-90 degrees to the lingual side and sweep to the second molar. Use the tip to keep the tongue away;
- Roll to the buccal side and complete the buccal sweep;
Upper full arch with preparation scan:
- Start directly on the occlusion (the first molar), then sweep along the occlusion till the preparation. Slowly wiggle the scanner when passing the centrals;
- Scan the preparation:
- Go to the occlusal side of the preparation.
- Roll to the palatal side.
- Roll to the buccal side.
- Rotate almost 90 degrees to get the best angle for the distal and mesial contact points.
- Rotate back to the occlusal.
- Continue swiping along the occlusion.
- Roll 45-90 degrees to the buccal side and complete the buccal sweep on one side of the preparation.
- Roll to the palatal side and complete the sweep.
- Complete scanning on the other side of the preparation by performing the occlusal sweep first.
- Perform the buccal sweep.
- Perform the palatal sweep.
Bite Scan:

- Insert the scanner tip into the patient's mouth at the buccal side of the molars.
- Ask the patient to bite firmly and start by scanning at the most distal position moving slowly forward.
- Align the scan area in the bite to see 50/50 of the upper and lower teeth and keep scanning until both scans snap into position and the jaws are aligned onto the blue bite.
- The scan should cover at least three to four teeth for perfect alignment even if the scans snap together earlier.
- For full arch scan repeat steps 1 - 4 for the opposite side.
For more scanning strategy videos with scanning workflows for different types of restorations please visit the following link: https://youtu.be/IGzf9qkztMo?si=Qt0eeyeOnxgDiqUT
Recommendations for Successful Scanning: Tips for Various Scenarios
- The occlusal sweep always comes first as it has most of the 3D structure, which makes scanning easier. The first sweep should be started at the first molar (if antagonist) or the preparation (to scan gingiva before it collapses from the retraction). Allow the scanner to get a good ‘starting point’ by waiting for 3-5 clicks before moving the scanner steadily and slowly 0-5mm above the teeth.
- When scanning the first sweep of centrals, it is important to cover both, the lingual and labial sides of the teeth. The easiest method is to slowly wiggle the scanner tip between the labial and lingual sides. The central teeth require more attention than the molars. Therefore, the scanner tip should move a little slower in that region.
- While scanning, the biggest challenge is to control the soft tissue, such as the tongue, lips, and cheeks as they may confuse the scanner if getting into its view and potentially slow down or even stop the scanning process. Therefore, the easiest second sweep depends on the jaw:
Situations with more preparations In cases of multiple preparations focus must be put on scanning the preparations before the gingiva collapses. If preparations are closely positioned, they may be scanned in one go. If preparations are further apart, the retraction agent can be removed from 2-3 teeth at a time, having these areas scanned before moving to the next region and repeating the procedure.